- WTClass Student Help Home
- Login Help
- Assignments
- Tests and Quizzes
- My Grades
- Community Tools
- Media
- Other
- Technical Help
- Technology Support Portal
![]()
Community Tools
Groups
These groups have their own collaboration areas in the course so that they can communicate and share files.
Your instructor places you in a group or allows you to select the group you want to join. Your instructor chooses which communication and collaboration tools are available to your group.
Find your course groups
Your instructor can provide access to your course groups in three ways.
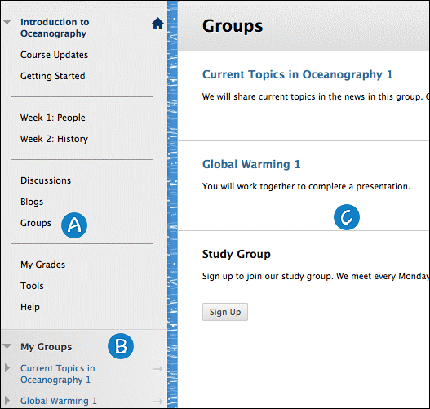
- Groups page link: The Groups page link may appear on the course menu or in a content area. The Groups page lists all available groups and sign-up sheets for self-enroll groups.
- My Groups panel: The My Groups panel appears after the course menu. You have direct links to the group area for each group you belong to. You can expand the panel to reveal the available group tools. If you're enrolled in a group, the panel appears automatically.
- Group link: You may be able to access your groups in a course area with links to a single group, sign-up sheet, or the Groups page.
When you access your group, you see the group homepage. The group homepage is the center for group activity and can contain a description of the group, a list of members, and tools. If your instructor allows, you can customize this page with a banner, select a color scheme, and add personal modules, such as Report Card. Personal modules are visible only to the member who added the modules. You can also access your group tools and assignments here.
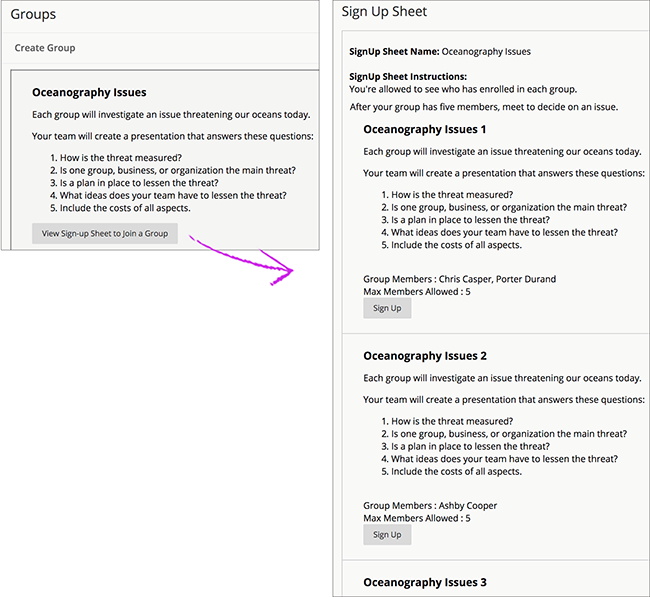
Sign up to join a course group
Your instructor may ask you to self-enroll in a course group. Based on your instructor's settings, you might see the names of other group members.
On the Groups page, select Sign Up or View Sign-up Sheet to Join a Group. When you select Sign Up again on the Sign Up Sheet page, you're automatically added to the group.
Create a group
If your instructor allows, you can create course groups that your classmates can join.
- On the Groups page, select Create Group.
- On the Create Self-Enrollment Group page, type the group name and description.
- Type a name for the Sign-up Sheet and Sign-up Sheet Instructions.
- Choose the Maximum Number of Members.
- Select Submit.
Group tools
Your instructor chooses which communication and collaboration tools are available to your group. If you want to use a tool but don't find on your group's page, ask your instructor to enable it.
Tool |
Description |
File Exchange |
Group members and instructors can share files in this area. All members can add and delete files, regardless of who added them. |
Group Blog |
In the group area, all members of a group can create entries for the same blog and build on each entry. All course members can read and comment on a group blog, but they can't make posts unless they are members of the group. Instructors can choose to grade group blogs. All group members receive the same grade. |
Group Discussion Board |
Group members can create and manage their own forums and discuss topics with just the group members. Instructors can choose to grade group discussions, but each member is graded individually. |
Group Journal |
In the group area, all members of a group can view each other's entries. Only group members and instructors can view a group journal. Instructors can choose to grade group journals. All group members receive the same grade. |
Group Task |
Group members can create tasks for distribution to all group members. |
Group Wiki |
Group members can edit and view their group wiki. Instructors can view and edit group wikis, and choose to grade group wikis. All group members receive the same grade. |
Send Email |
Group members can email individual members or the entire group. |
Exchange files with a group
With file exchange, you can share files with other members of your group, including your instructor. You can't create folders in file exchange. With your group, decide how you want to name files so that they are easier to locate in a long list.
Add a file to the file exchange
Group Tools > File Exchange > Add File
Add a name for the file you want to upload. Browse for the file and submit.Delete a file from the file exchange
You can delete any file, even if you didn't upload it. On the File Exchange page, select Delete in the file's menu.
Frequently asked questions
How do I remove myself or someone else from a group?
After you're enrolled in a group, only your instructor can remove you from a group, including self-enroll and student-created groups.
How can I add my classmates to a group I created?
If you create a group, your classmates have to self-enroll in the group. In the list of groups, they select Sign Up after the group name.
How do I join a group one of my classmates created?
Find the group listed on the Groups page and select Sign Up. The group displays in your My Groups area.