- WTClass Student Help Home
- Login Help
- Assignments
- Tests and Quizzes
- My Grades
- Community Tools
- Media
- Other
- Technical Help
- Technology Support Portal
![]()
Community Tools
Community Tools
On This Page
- How to Access a Blog
- How to Create a Blog Entry
- Viewing Blog Drafts
- How to Comment on a Blog Entry
- How to Edit a Blog Entry
- Viewing Blog Grades
Videos
Blogs
A blog is your personal online journal. Each blog entry you make can include any combination of text, images, links, multimedia, mashups, and attachments. Blogs are an effective means of sharing knowledge and materials created and collected by the group in the course. You can post entries and add comments to existing blogs. Use your blog to express your ideas and share them with the class.
As the owner of a blog, you will create multiple entries over a period of time. Your instructor and course members can add comments. A blog can also be owned by a course or a group. In the group area, all members of a group can create entries for the same blog, building upon one another. Any course member can read and comment on a group blog, but cannot make entries if they are not a member of the Group. Your instructor can also offer comments and grade individual entries.
The blog topic page is divided into two main sections. You can view the Instructions in the content frame. Click the X to collapse the field. In the side panel, you can view information about the blog. You can expand and collapse sections in the side panel using the double arrows.
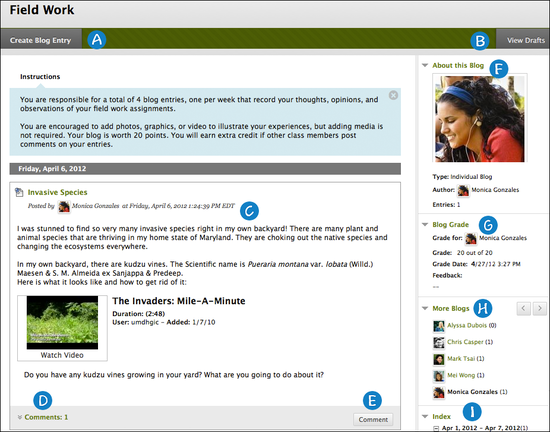
- Create Blog Entry: Create a blog entry using the Create Blog Entry function. You can create another blog entry for a topic at any time. For example, your instructor may add a comment requesting that you clarify what has been written before a grade is assigned or suggest a topic for another entry.
- View Drafts: Access any entries saved as drafts. Click View Drafts on the action bar.
- Blog Entry: Blog entries appear in the content frame following the Instructions.
- Comments: After posting an entry, you can see if other users made comments. Click the link to view comments.
- Comment: Add comments by clicking Comment.
- About this Blog: In the side panel, view the blog information in this section. By default, About this Blog is collapsed. You must expand it to see the information.
- Blog Grade: This section appears if your instructor enabled grading for the blog. You can see if your blog entries have been graded.
- More Blogs: View blog entries made by other course members.
- Index: View the titles of your selected entries for either the week or the month, determined by the settings your instructor makes during blog creation. The most recent entry title appears first.
How to Access a Blog
You can access three types of blogs.
- Course: All enrolled users can create blog entries and add comments to blog entries.
- Individual: Only the owner of a blog can create blog entries. All other enrolled users can view and add comments.
- Group: If your instructor enables the blogs tool for a group, all group members can make blog entries and make comments. Any course member can view group blogs, but they only have the option to add comments. You can make entries only to your own group blog.
Your instructor can edit and delete entries in all three blog types and delete user comments.
If you are removed from a course, you will not have access to any blogs. If you are removed from a course after individual blogs are created, all your entries and comments will be deleted. If you are removed from a course after course blogs are created, all your entries and comments will be retained, but the name of the author or commenter is changed to "Anonymous."
- On the course menu, click Tools.
- On the Tools page, select Blogs.
- On the Blogs listing page, click the name of the blog you want to access.
How to Create a Blog Entry
Only your instructor can create a blog, but after creation, you can create entries. The blog topics appear in alphabetical order on the Blogs page. Following each blog title, view if the blog belongs to a group, the course, or to individual students.
- On the course menu, click Tools.
- On the Tools page, select Blogs.
- On the Blogs listing page, click the name of the blog you want to access.
- On the blog's topic page, click Create Blog Entry on the action bar.
- On the Create Blog Entry page, provide a Title.
- Provide text in the Entry Message text box.
- Optionally, in the Blog Entry Files section, attach a file using one of the following options:
- To upload a file from your computer, click Browse My Computer.
- To upload a file from the course's storage repository, click Browse Content Collection.
Files added by students appear only in their entries. They are not stored in Course Files or the Content Collection.
- Click Post Entry.
-OR-
Click Save Entry as Draft to save the entry for later posting.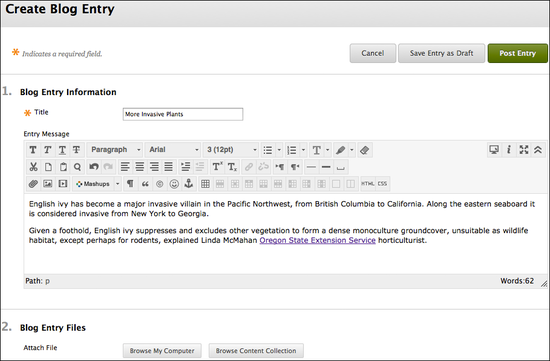
Rubrics
If your instructor associated a rubric with the blog and made it available, click View Rubric in the Blog Grade section to display grading criteria. If no associated rubric exists or your instructor made none available, you will not see the View Rubric function.
Viewing Blog Drafts
Click Save Entry as Draft to save blog entries for later posting. Click View Drafts to view these entries on the main blog page. Click the title of the entry to edit and post.
How to Comment on a Blog Entry
You can comment on one another’s blog entries, whether they belong to an individual, the course, or a group. Your instructor determines if you can make anonymous comments and if you may delete blog comments.
- On the course menu, click Tools.
- On the Tools page, select Blogs.
- On the Blogs page, click the name of the blog you want to access.
- On the blog's topic page, view a blog by clicking a user’s name in the side panel in the More Blogs section. The user’s blog entries open in the content frame.
- Click Comment for the appropriate post.
- Type your response in the Comment text box.
- Click Add.
How to Edit a Blog Entry
Your instructor determines if you are allowed to edit your blog entries. If you edit gradable blog entries, the original graded entries will be lost.
- On the course menu, click Tools.
- On the Tools page, select Blogs.
- On the Blogs page, click the name of the blog you want to access.
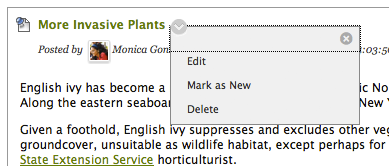
- On the blog's topic page, access the entry's contextual menu and select Edit.
- On the Edit Blog Entry page, make your changes.
- Click Post Entry.
Viewing Blog Grades
After your instructor grades your blog entries, you can view your grade in two places. The grading information appears in the Blog Grade section on the blog's topic page and in My Grades. You can also view your instructor's feedback and the date the grade was assigned.
Rubrics
If your instructor associated a rubric with the blog and made it available, click View Rubric in the Blog Grade section to display grading criteria.
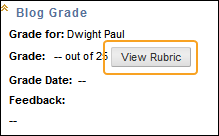
If no associated rubric exists or your instructor made none available, you will not see the View Rubric function.